AMP Pages Missing Canonical Tags: How to Detect and Resolve the Issue
When running a site audit or checking in Google Search Console, you might come across the warning: “AMP Page URL is missing a canonical tag.” This message means that the AMP version of your page doesn’t reference the main (non-AMP) version using a canonical tag—a key element that helps search engines understand the relationship between the two versions and avoid indexing duplicate content.
In this guide, we’ll explain the issue, show how to identify it, and walk through the steps needed to implement a proper fix across various platforms including WordPress.
What Does It Mean When an AMP Page Lacks a Canonical Tag?
AMP (Accelerated Mobile Pages) are streamlined versions of web pages designed for fast loading on mobile devices. However, each AMP page should include a <link rel="canonical"> tag that references its original non-AMP counterpart. Without this, search engines might treat the AMP version as a separate page, potentially creating duplicate content and diluting your site’s SEO signals.
Why Canonical Tags Matter for AMP
Avoiding Duplicate Content
Canonical tags help consolidate identical or similar pages by telling search engines which one is the preferred version. This prevents AMP and non-AMP pages from competing in search rankings.
Correct Indexing
Search engines use the canonical tag to decide which version of a page should appear in search results. Missing it can lead to the wrong page being indexed.
Maintaining SEO Authority
By clearly linking the AMP version to its canonical page, you ensure that ranking signals like backlinks are not split between two versions.
What Causes the Canonical Tag to Be Missing?
This issue usually happens because:
- The AMP page was created manually or outside of a CMS and lacks the canonical reference
- SEO or AMP plugin settings are misconfigured
- Developers forget to add the tag in the HTML of the AMP template
- Standalone AMP pages are not linked to their original versions properly
How to Check if a Canonical Tag Is Missing
1. Inspect with Browser Developer Tools
- Open the AMP page in Chrome or Firefox
- Right-click and select Inspect (or press
Ctrl+Shift+I) - In the Elements tab, navigate to the
<head>section - Look for a tag like:
<link rel="canonical" href="https://www.example.com/original-page/">
- If it’s missing or incorrect, the AMP page isn’t properly configured
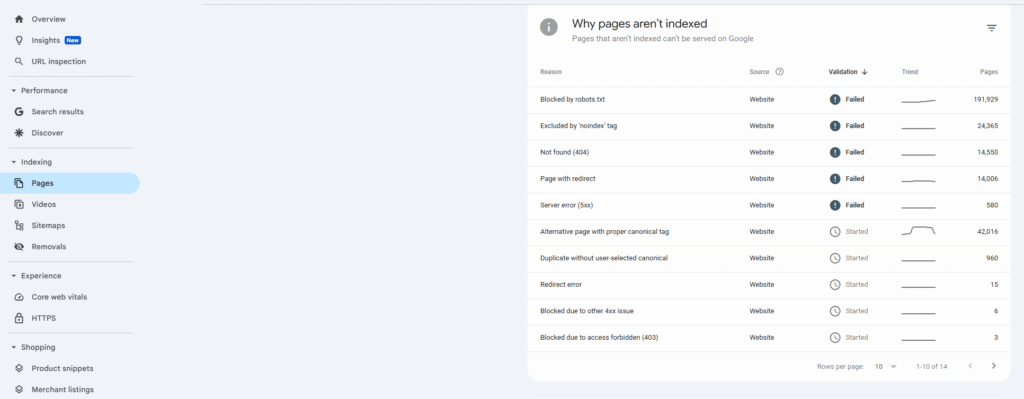
2. Use Google Search Console
- Sign in and select your site property
- Go to Pages > AMP
- Review any listed issues, especially ones related to missing canonical tags
- Inspect individual URLs for more details
3. Use AMP Validation Tools
- Visit AMP Validator
- Enter the URL of the AMP page
- Run the validation check
- If the canonical tag is missing, it will appear as an error
4. Run a Site Audit with SEO Tools
Use platforms like Ahrefs, Screaming Frog, or Sitechecker
- Scan your website for AMP-related errors
- Look specifically for “Missing canonical tag” in AMP sections
How to Add a Canonical Tag to an AMP Page
Step 1: Identify the Correct Canonical URL
Find the full (non-AMP) version of the page. This will be the URL you reference in the canonical tag.
Step 2: Modify the AMP Page’s HTML
Open the HTML file of the AMP page. In the <head> section, insert the following line:
<link rel="canonical" href="https://www.example.com/original-page/">
Here is what the head of a basic AMP page should include:
<!doctype html>
<html ⚡>
<head>
  <meta charset="utf-8">
  <link rel="canonical" href="https://www.example.com/original-page/">
  <meta name="viewport" content="width=device-width,minimum-scale=1,initial-scale=1">
  <style amp-custom>
    /* Add your custom styles */
  </style>
  <script async src="https://cdn.ampproject.org/v0.js"></script>
  <title>Page Title</title>
</head>
<body>
  <!-- AMP content -->
</body>
</html>
How to Fix This Issue on Different Platforms
For Static HTML Sites
- Open the AMP file in a code editor (like Visual Studio Code or Sublime Text)
- Paste the canonical tag in the
<head>section - Save and re-upload the file to your server
For WordPress Sites Using Yoast SEO
- Install and activate the Yoast SEO plugin
- Go to the AMP page in the WordPress editor
- Scroll to the Yoast SEO panel
- Click the Advanced tab
- Enter the original (non-AMP) URL in the Canonical URL field
- Save the changes
For Sites Using the Official AMP Plugin for WordPress
- Ensure you are also using a compatible SEO plugin like Yoast or Rank Math
- These plugins automatically manage canonical tags for AMP pages
- Double-check that the canonical tag appears in the source code
For Joomla
- Edit the article from the Joomla admin dashboard
- Add the canonical tag manually in the template or using metadata options
- Save and test the changes
For Drupal
- Install the Metatag module
- Go to the configuration panel for AMP content types
- Set the canonical tag to point to the main content page
- Save and clear cache
Confirm the Fix
After implementing the canonical tag, verify it using any of the following methods:
In Browser Developer Tools
Open the AMP page and view the source
Check for a <link rel="canonical" href="..."> in the <head>
AMP Validator
Re-run the AMP Validator tool
Ensure that no errors or warnings appear related to the canonical tag
Google Search Console
Use the URL Inspection Tool to test the AMP page
Request reindexing once the tag is in place
Monitor the AMP report for updates
Final Thoughts
AMP pages are great for mobile performance, but without a canonical tag, they can hurt your SEO by confusing search engines. Fortunately, resolving the issue is straightforward: identify the correct canonical URL and insert it properly into your AMP HTML.
If you use a CMS like WordPress, plugins like Yoast and Rank Math make this even easier. Always test your changes, revalidate with AMP tools, and monitor results in Google Search Console to make sure everything is working as intended.